A Spot of Bother – Beware The Blob!

I’m quite convinced that when I talk to some clients about post production, they think I’m just a con artist trying to make life difficult, complicated and expensive for them. Perhaps they put me in the same category as a car mechanic, who stands there sucking his teeth, telling you all the expensive things he’ll have to do to your car to make it run properly. Like emptying the ashtray, or fitting a new phalange.

Why can’t I just shoot the photos and hand over a CD of everything and let the client go on their merry way? Well I could, but before I let my pictures go, one of the most important tasks I carry out is to ensure the images are clean.

I don’t mean I check them for naughty lady bits. Hopefully on an average corporate shoot there isn’t even the remotest risk of that. What I mean is the fuzzy blobs that show up on a photo when dust attaches to the camera sensor*.

This is a common problem for digital SLR cameras. Every time I change a lens, I’m letting dust into the gaping mouth of the camera, and the next time the shutter is fired the dust gets attracted by static charge onto the sensor which shows up as a grey mark on the image.

Some SLRs have special cleaning settings which shake the sensor down on startup, in the hope that the dust can be vibrated off. But these systems are only effective up to a point. I regularly clean my sensor manually, but I have to change lenses on most shoots, letting more Hoffman – sorry, I mean Dustin.

dust spot on digital photo sensor.

Top and bottom-left, blobs tend to show up more against blue.

So when I get the images onto my computer, in addition to the setting of resolution for print or web use, colour and exposure tweaks, captioning etc ad infinitum, I check each and every frame for those dreaded blobs. If not viewed at the right percentage (size) on screen, they can easily be missed, but they’ll manage to show up nicely on your website, and even more so in print.

To the extent that they’ll look ugly on a photo, they can wreck an expensive print run of brochures, so tell me, do you feel lucky? Do you think you can spot and eliminate The Blob? Apart from anything else, do you really have the time to sit there and take blobs off every photo you use? And what if you miss one?

Next time you think the photographer resembles a shark with the scruples of a politician, just remember the alternative could be worse; a photographer who doesn’t care enough about your project to do proper post-production.

*To be pedantic, it isn’t the imaging sensor which gets the dust on it, but a filter which sits directly in front of the imaging chip. This filter, known as a high-pass filter, is there to reduce the amount of infrared light getting to the sensor, as this gives photos a strange colour cast. Digital camera sensors are very sensitive to infrared light, so the filter is necessary to counteract it.

DIY or Die Trying

If you’ve read my previous two posts (using stock and using commissioned photography for your website) you’ll have a fair idea where I stand when it comes to shooting your own photos or getting a friend or relative to do it for you.

To sum up the main pitfalls, perhaps the biggest risk with getting a friend/relative/pet to take a few snaps for you as a favour is that having put them to the trouble, if the shots turn out so terrible they make you want to tear out your eyes, you’ll still feel beholden to use them – to promote your business. Oh dear.

The problem with taking them yourself is you might feel they’re excellent shots, but you’re too close to the action to be your best critic. You know what was involved in taking the pictures and what hard work it was, and you’ll be terribly proud of the results, but no one else will see that. They’ll just see the photos for what they are, however good or bad.

Having said all that, some business owners will always opt for DIY to save the expense of using a professional, so I’ll set out some basic pointers to help you make the best of your efforts.

  • Plan ahead:

Work out what pictures are required, maybe talk to your web designer if you have one, rather than taking thousands of random shots and hoping for the best. Which people, services and processes are key? Don’t forget though that a photo of your office building/machinery/entire staff contingency isn’t necessarily going to make more business for you. This isn’t about what pleases you about your business, it’s about what attracts clients and customers.

  • Choose locations with care:
tim gander on telephone

The phone-cam look; not good.

So often you’ll see business portraits of people who have been lined up against a wall and shot Mafia-style. You can see the fear in their eyes! Or they’ve been surprised at their desk, mid-phone conversation, mouth gurning in an embarrassing contortion, or more likely miming a swear word. The flash has obliterated their features, and the red-eye is excruciating. Try taking them to a more relaxed location. Keep them distant from ugly or distracting backgrounds, use shaded daylight to avoid squinting and ugly shadows, and use the telephoto function to crop in close so their face fills the majority of the frame.

bath commercial photographer tim gander portrait.

Still not pretty, but a better photo.

  • Stay legal:

If you want to photograph people or locations not directly connected to your business, make sure you have either model releases or property releases where necessary.

  • Think quality:

As tempting as it might be to set your camera up so you can get 10,000 images on a single memory card, the quality will drop dramatically and this will show in the end result. You might also need the pictures for print publications too, and this will require even better quality than web use. Also, for the love of Sweet Jesus, don’t (DON’T!) take photos on your mobile phone with the hope of getting anything that resembles professional quality. It’s just not going to happen.

This short article can only cover the most basic of basics, but if you’re using non-professional photography in your business, perhaps another option would be to get a corporate photography trainer in (such as my good self) to at least train someone up to improve the results you’re getting. It could be a one-off session gets you on the right track, and at least when I leave the building, the skills stay with you. Drop me a line today to find out more.

No really, you’re beautiful…

Hooray! You’ve decided to blow the dust off your aged and failing website, spruce it up with a refresh or redesign, and you’re planning on getting some genuine, original photography shot just for your business. What should you look out for?

Perhaps the first and most obvious thing to think about is the style of photography and photographer you’re after. If you’re promoting your business, you’ll need a specialist commercial photographer. Look at the portfolios of different photographers, and think about whether any given photographer can deliver the quality and style you need. Don’t just pick at random or use the friend of a friend who happens to have a nice camera. Remember, this is your business you’re promoting. How you present it will influence what people think of it.

Budget sensibly. Again, this is your business you’re trying to promote. If your website is your shopfront, it needs to reflect the quality of your business. That needn’t cost a fortune, and making enquiries about likely costs is free.

In my last posting I dwelled on some of the pitfalls and legalities of using stock agency photos (often referred to as microstock because the payments are very small). It’s only right then that I highlight the same for commissioned photography.

  • Don’t assume you, your staff or your business aren’t photogenic enough:

A good photographer will do everything to ensure you and your staff look good, and probably better than you thought possible! Also remember, business isn’t a beauty pageant and people don’t see you the way you see yourself. The same goes for your premises and processes. There may be details and angles you’ve seen a million times and never had a second thought about, but a decent photographer will make them look interesting, and use them to help tell your story.

business man in front of world map

It's your business, show you're proud of it.

  • Watch the price:

As with stock imagery, you need to know what the cost will be. It’s tricky to estimate this without some idea of what will be involved in shooting pictures for you, but draw up a rough brief of what you’d like photographed, how many images you hope to achieve and what the pictures are to be used for (internal comms, external PR, corporate publications and web, advertising etc) so the photographer can give some idea of likely fees. Make sure the time required to shoot the images is sufficient, and make sure the photographer’s estimate includes permission to use the images. I work out my fees based on a combination of the likely time and resources needed for the shoot, the likely number of pictures required, plus the uses the client will require of the images. I combine these elements to give an over-all figure.

  • Check the T&Cs:

Again, as with stock, check the photographer’s T&Cs and that the agreed uses match your requirements. My T&Cs are based on standard UK ones, but the uses agreed vary according to the client’s requirements.

  • Get references:

Ask for references from other clients. I’m certainly happy to offer references if asked (and no, it isn’t my Mum that I’ll put you in touch with!)

  • If things go wrong:

The great thing about working with a specific photographer is that should anything go wrong, you have a human being you can take up the problem with, not a faceless agency. The advantage of a professional is that they will do their best to foresee likely problems and tackle them in advance, and will do their best to keep you happy if there are any issues after the shoot.

The next article in this series will look at the issues involved in taking your own business photos, or getting a friend or relative to do them for you. You can hazard a guess at what I’ll be saying about that…

A Fistful of Pixels.

You have a digital camera, you have a mobile phone, you know they have a few million pixels in them, but the latest models have more. Do you need them? Will your photos come out better if you have them?

YAWN! The camera manufacturers pixel race has been the most boring competition since the last World Paint Drying Championships held in 1957. Ever more astonishing numbers of pixels in their cameras, but does it make that much difference?

This is an idiot’s guide (that is to say a guide written by an idiot) to what a pixel is, and how many you need.

Since film has been outlawed by the Japanese, we’ve all moved to using electricity to capture images of everything from kittens to sunsets. In fact, the entire photographic gamut from K to S is now recorded using digital cameras.

A pixel is basically a tiny diode thing, which records light and converts it into a digital signal which the camera’s electronic brain can store for later viewing on porn sites the World over.

Each pixel has a microscopic lens in front which focuses the light onto it, and which stops light that hits one pixel influencing the neighbouring pixel and making your photos fuzzy(er).

Each pixel also has three teeny tiny amplifiers connected to it, which boost the electronic signal and record the light as being either red, green or blue.

So aren’t all pixels equal? Well no. You see when a manufacturer makes an imaging chip, they can decide what size the chip will be, and then how many pixels they’d like to pack onto that chip.

A mobile phone might have 3, 5 or 8 million pixels on a chip the size of a baby’s fingernail. A compact camera might have the same number of pixels on a chip twice that size, while a professional SLR might have 12 or 18 million pixels on a chip the same size as a “old skool” film negative (35mm).

How this works is by making the individual pixels smaller and bunched closer together for smaller chips, and larger and more spaced out on larger chips. And perhaps surprisingly, bigger pixels are generally better. Smaller pixels packed densely onto a small chip tend to suffer interference, which messes up the photo.

If you want to know what interference looks like, take a photo on your compact camera or mobile phone using its highest ISO setting (this is the chip sensitivity and equates to the old film speeds), or take a photo without flash in a darkish room.

When you look at the shadow areas of the photo, you’ll see digital grain, or noise, and lots of messy red dots which is where the pixels are starting to have a bit of a fight with each other. Those red dots are in fact, tiny pools of blood from the scuffle.

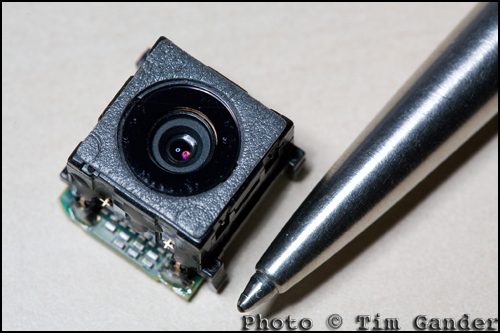
photo of the camera unit from a Sony Ericsson mobile phone.

This mobile phone camera unit houses lens, shutter, imaging chip and circuitry. No room for a large sensor.

So when you look at a mobile phone that claims to have 8 million pixels, remember those pixels are very, very small compared to the ones in an SLR. And small doesn’t mean more detail. In fact, if you have the choice between 5 million and 8 million on a mobile phone, you really won’t get any benefit from the higher pixel count. It’s just manufacturers want you to think you need the extra pixels so you can take better pictures and they’ll happily sell you the next model up.

Really all you need to know is that around 3-5 million pixels on a mobile, and maybe 8 on a compact camera, is ample for all those pictures of kittens, sunsets and drunken mates.

New technologies are coming through which will make these smaller chips work better, but then the same technologies will be introduced to larger-chipped cameras, and the quality will improve relative to that, so you’ll always be better off with a modest pixel count or a much larger chip.

So there you have it, the definitive, incontrovertible guide to pixels, which will remain current and authoritative until about next Wednesday, when no doubt a manufacturer will announce a 30 million pixel chip the size of a pin head which will capture fine detail in total darkness. The phone they put it in will still drop the signal every time you walk from your car to the front door…

Post Production? ’tis the Devil’s work!

Post production is the process that dare not speak its name. It is surely some manner of witchcraft; the sort of thing only the Devil’s nerdy brother would be into. So what is it? And why should you care?

The concept is simple, the practice less so. Post production is what happens to the photos after the shoot, and before they’re delivered. And though you don’t necessarily need to know what post production is, it is helpful if you have an idea of the basics.

The image file that comes straight from a digital camera isn’t matched to any particular use, and is therefore not matched to any use. To explain that a little better; the camera file will normally be the right resolution for web (72dpi) but will be too large a file to upload. At the same time, it will be physically large enough to produce a print, but needs to be converted to around 300dpi for good quality print output. So the file needs to be resized to suit the end use.

Other things need to happen too. Often the photo will need some tweaking to get the colour, brightness and contrast perfect for the intended use. Also, while the image will be perfectly in focus (because I don’t take out-of-focus photos – no sniggering at the back!) it will need a little digital sharpening to make it appear really crisp in print or on the web. That’s just a characteristic of digital.

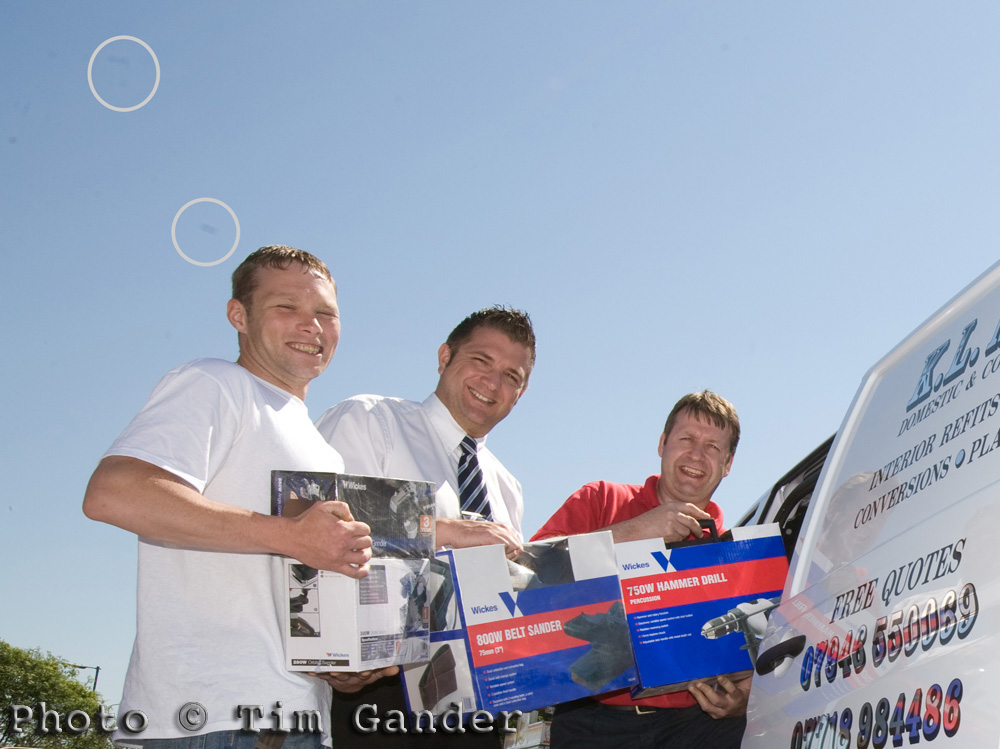
Digital SLR cameras tend to have a problem with dust getting in through the lens mount (normally when changing lenses) and adhering to the imaging chip. These then show up as grey blobs and hairs on the image which need to be cloned out in Photoshop or they’ll show up in the published image.

jpeg showing dust on highpass dslr filter

Play Spot the Dust! I've highlighted some. Click the pic to find more.

Adding captions, applying the relevant colour profile and conversion from RAW to jpeg format are also part of post production.

While some of these processes can be done in batches, some have to be carried out on each individual file. This can add considerable time to the overall process of shooting and supplying images to clients, and that time has to be factored into the assignment fee or charged separately, at which point my client might be wondering what they’re paying for. If I’ve factored it in, where another photographer hasn’t, it can make me look expensive, but then I’m not a “dump and runner”.

A dump-and-run photographer is one who simply writes the image files straight from camera to disk with little or no post production, dumps the files on the client, takes the money and runs. They may look like a cheaper option, but the truth is you’re not getting a professional service or top quality images, and this will be reflected in the final project.

Post production can be tricky and incredibly dull work, but I pride myself in the quality of work I deliver. And while you don’t need to know all the technical details, it’s at least worth understanding that it is a necessary process. And the Devil’s nerdy brother doesn’t charge as much as he used to…

Captain Caption’s Last Stand

Or, Captain Caption and the WORDS OF DOOOOOOM!

Okay, so we’ve already had two thrilling episodes of Captain Caption, and in this one we see our Lycra(TM) -wearing hero save the day yet again as we delve into the murky waters of the legalities of caption writing.

Actually, if you’re sensible, it’s not all that murky, but it’s wise to be aware of some basics.

I’ll deal with this in two sections, editorial and web. This applies to captions which appear under (or adjacent to) a photo, or the embedded caption in the IPTC table, which I covered previously.

If you’re sending out captions as part of a press release, either to print or web, you need to apply editorial standards. That is to say, the caption needs to be accurate and succinct. The first of those is vital. It is possible to libel someone by using a misleading or false caption on a photo. So stick to the facts of the story, and the realities of what is in the photo.

Be careful with your choice of words in captions. If a teetotaler is photographed holding a glass of water at a charity bash, don’t just caption that Mr X “enjoys a drink at the event” as the connotations could be misconstrued. There are too many examples to list, but common sense should guide you.

deceased footballer george best at portsmouth football ground

George Best - Safe to refer to his drinking because it's true. And in the UK, you can't libel the deceased.

The really simple answer is that if you’re going to send out a photo with a press release, get a press-trained photographer to shoot and caption the images. They’ll understand the style required, and the legalities of accurate captions.

Of course where images on the web are concerned, you still need to be careful to be accurate and avoid libel – perhaps more so because of the reach of the web, but the most commonly-committed sin on web images is to omit or strip out the electronic caption stored in the IPTC table.

You may not think this is much of an issue, and although it isn’t a criminal offence to omit the caption it can still lead to legal problems. Anyone who takes a photograph has the moral right under the Copyright, Designs and Patents Act (1988) to be identified as the author of their work. All professionals and image libraries will state this as a term of use of their images.

Unfortunately, it’s not too difficult to strip out the table and leave the photographer unidentified with their own work. This is an issue which all web designers will need to address increasingly as there are moves afoot to introduce an orphan works act in UK legislation. This would allow image users to find pictures on the net and use them without paying if they can’t track down the original author. It’s a bit more complicated than that, but it’s a huge threat to the viability of professional photography, and could also result in the pictures you took or bought for your business web site being lifted and used in ways you might not appreciate and without the IPTC caption identifying the author, it makes the images even harder to keep track of once they’re out there.

So remember, when composing captions; play safe, be accurate, keep it simple and make sure you keep it attached to the photo.

But now Captain Caption has flown his last mission. The skin-tight hero costume is wearing alarmingly thin at the crotch, and the cape keeps getting tangled in revolving doors, so I’m going to leave captions for a bit. Of course if this or the other articles have thrown up any questions for you, do comment them here and I’ll answer as best I can.

Captain Caption Flies Again!

Faster than a speeding bullet, and just as hot, he’s back with more information on how captions can help save the day, and as the marketing gurus like to say, “drive business to your website”. I make no such inflated claims, but getting traffic to your site may be a start on the road to “threading the needle of success.” I swear someone actually wrote that in a blog.

Following on from the previous article, where I explained that embedded captions in the photo’s IPTC file are an excellent idea if you want a news desk to be able to identify the subjects in your press release pictures, there is another very good reason to caption pictures fully and accurately.

You see when Google (other search engines are available – no, really they are) send their spiders to crawl your site, they can see the text and even understand it to some extent. But when they come across a jpeg image with no caption, Google just sees a blank space.

Think of it as describing the photo to a blind person. If you want Google to index your page and its contents, you need to tell it what’s in the photos.

Blank jpeg showing what google sees when there is no caption in IPTC fields.
Google sees a blank space when there is no caption.

Search engines love photos, because they love content-rich sites, and pictures help with that. Search engines also want to know that the content of a site is relevant to the site itself, so again you can use captions to reinforce the content of your site. Google will love your site that little bit more if the pictures of furniture on your furniture restoration web site are described accurately, because the pictures and the written content will match up.

In addition to the caption describing the picture contents, you can use the Alternate Text field you see when uploading an image to a blog to give the spiders something else to latch onto.

If someone googles “queen anne table restoration” they’ll get search results on pictures as well as main web sites. If your site has properly captioned images, this can help draw visitors to your site. It’s another way of making it easier for search engines to find relevant content, so why not make use of it? It doesn’t cost anything but time.

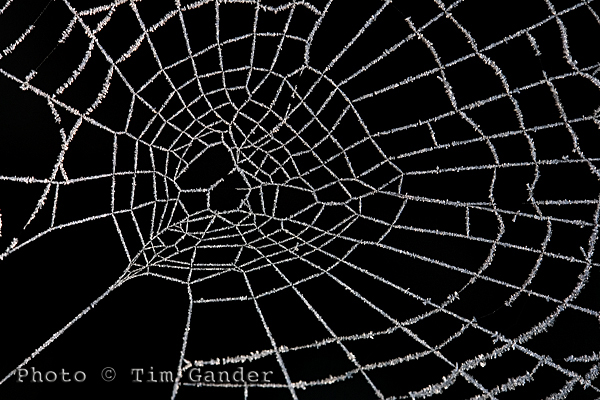
frozen frost on a cobweb spider web

Use Alt Text and caption fields to improve SEO of your site.

One thing you need to be wary of if you don’t want all your caption time to be wasted is when using automated saving software, such as the Save for Web option in Photoshop because this strips out the IPTC data.

The Save for Web function is a throwback to the days of dialup internet connection, when IPTC data was seen as bandwidth-hungry and unnecessary. This is no longer an issue with broadband, but web designers use it as a quick way to deal with images. Unfortunately it causes problems, not only with captions and keywords being stripped out, but also with copyright information being discarded too, which can lead to legal problems which I’ll deal with in my next article.

So get writing those captions, give Google, Bing and um… whoever what they want. If you don’t feed the spiders good stuff, they’ll come after you!

So until my mummy washes and irons my superhero outfit, it’s time to say, UP! UP! AND AWAY!

Captain Caption to the Rescue!

Is it a bird? Is it a plane? NO! It’s CAPTAIN CAPTION TO THE RESCUE!!!!! (hooray!)

One area of photography you don’t hear too much about is captions, and yet they are very important and pretty useful. So here’s Captain Caption (if only you could see my splendid cape and lycra stockings) to explain a bit more about them.

In the good old days, a caption was a little slip of paper stuck to the reverse of a photo. It would say the date the photo was taken, state the photographer’s (and/or agency) name and contact details, give the who, what, where, when and why of the content, and the copyright status of the image.

Of course it’s quite difficult to stick a piece of paper to the back of a digital photo. I tried once and it broke my laptop. So instead there is an embedded file (or table for the computer pedants) into which the photographer can and should write all this information. It’s called the IPTC , Metadata or File Info field of the photo and is accessible through Photoshop and other photo editing and viewing software, but not in standard image browsing software that comes with a PC, which is often why people don’t know about captions. For simplicity I’ll be talking about the IPTC table as used within the Photoshop File Info menu.

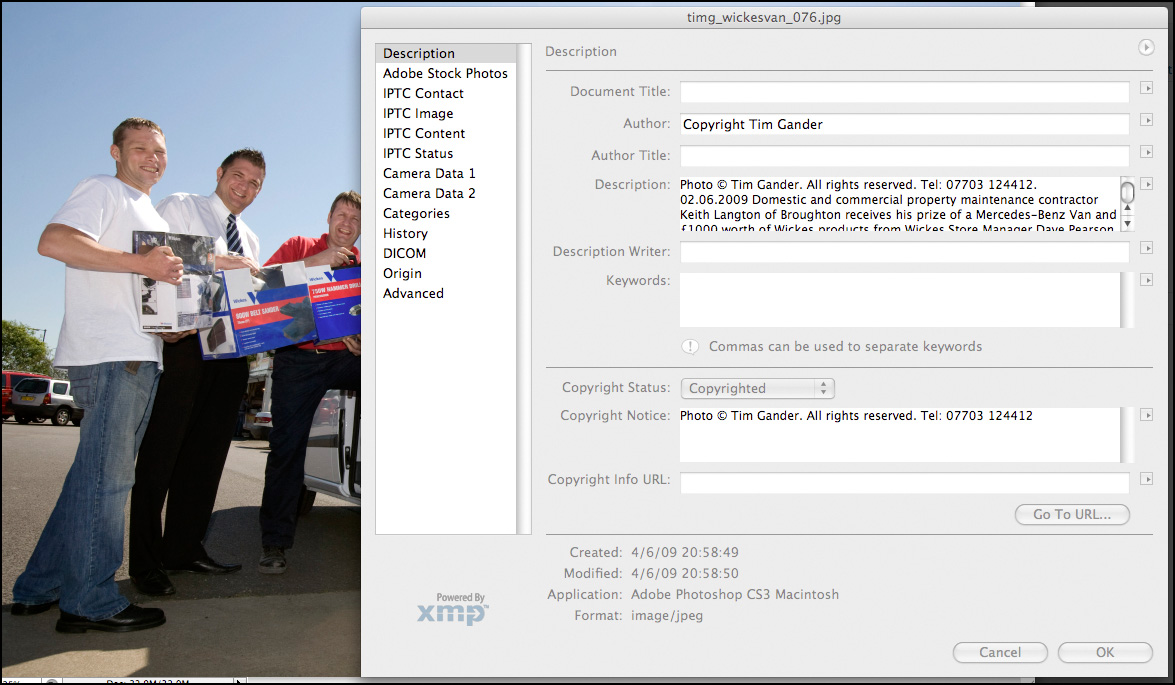
Within this table, there are various fields which can be filled in, the main one being Description. Here the photographer, or anyone with the right to add and alter the text, can enter a title, name of the author (photographer), description (the who, what, when, where and why), keywords and copyright notice.

IPTC file info field

This pane is accessed through Photoshop/File/File Info. Click to see more detail.

Taking press and PR as an example, it’s good professional practice to send properly captioned photos with press releases because it means that the photo can always be matched up with the right story. Remember, it’s not difficult for the photo and press release to become separated at the other end. You can also put other useful information in, such as how to contact the PR person handling the story if it’s a PR picture. It’s a good idea also stipulate in the caption that the photo is only to be used in conjunction with the original article, to prevent it being used as a stock image if the PR client is involved in an embarrassing future story.

There is another, even more up-to-date and compelling reason to have informative, descriptive captions on photos and a good reason to use the keywords cell of the File Info table, and that’s when it comes to using photos online. This being a blog of limited length I’m going to leave you on a cliffhanger, and you’ll have to tune in next week to hear how Captain Caption gets those dastardly Web Spiders to crawl to a different tune…

Free Resources!

As some of you may know, I have put together some free resources in a gallery on my web site.

Unfortunately, setting up the gallery on my website such that it doesn’t require a lot of complicated administration for those wishing to download the resources has proved impossible, so to make your lives easier, I’m moving the resources to here.

This page will change as I add more resources, so do please check back from time to time.

Tim Gander Fees Guide

Booklet of Ideas.

Booking Guidelines

T&Cs

Captions1

Captions2

Post Production

If you have any problems using this page, or would just like to get in touch, please contact me at [email protected], or call me on 07703 124412.

Calibration for the Nation!

In the previous posting I made a wild stab at explaining what colour “is” in computer terms. Your eyes glazed over, your attention drifted, and before you knew it you were back on youtube watching a kitten playing with a budgie, or something. So to add to your misery I’m going to explain what calibration is and how it can help you.

Hopefully you’ll at least remember that colour profiles help computers to see colour more accurately. Well think of a calibrated monitor as helping your computer to show colours more accurately, because while the profile will tell the computer the various colour values within a photo, if your monitor isn’t calibrated to set standards it can’t show those values accurately.

You can profile a printer, camera or scanner with the right equipment, but I’ll stick to monitors and printers for now as that’s how most of you will be working with and viewing photos in the digital context.

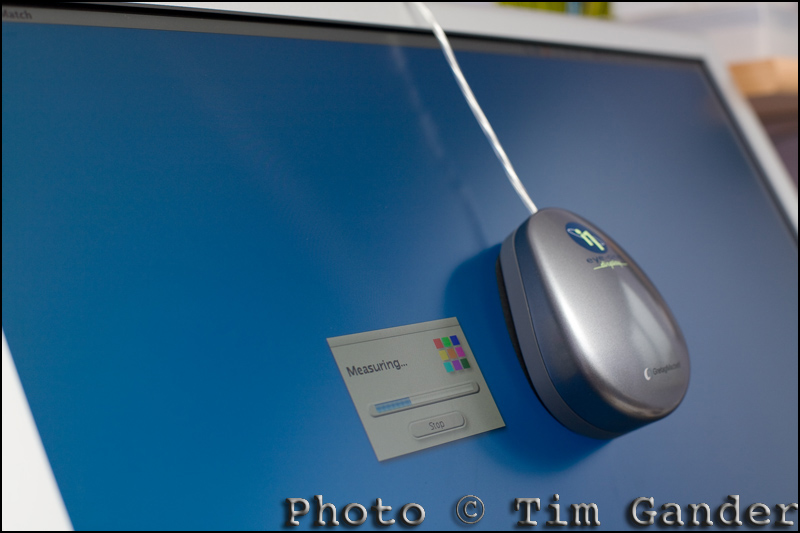
To calibrate a monitor and create a colour profile for it, you will need a calibration device. I use the Gretag Macbeth eye-one display (don’t mention calibration in a theatre, it brings bad luck). It’s relatively old by modern standards, but works for me. I simply set my display to the brightness setting I like to work at, place the eye-one on the surface of the monitor, and run the software. This then cycles the display through a series of blacks, greys, whites and colours and creates a monitor profile at the end which I save and set as the default monitor profile.

gretag macbeth monitor calibrator on apple display
Calibration takes just a few minutes.

Most people use LCD displays now, and these tend to give more stable colour than the old CRT displays (big, bulky screens of old) , but I still re-calibrate about every three months. This may be overkill, but I remember to do it every time my VAT bill is due.

The reason for re-calibration is that whichever type of screen you use, LCD or CRT, colours can shift over time, so it’s best to keep them set to a fresh profile every six months just to be sure you’re getting consistent colour reproduction.

Printer calibration is also useful. You want photos to print out much as they appear on your monitor, or you’ll just be taking wild guesses at brightness and colour.

You can buy calibration devices that will calibrate both monitor and printer, but they tend to be expensive, so I’ve always sent off a test print to be calibrated professionally. You simply print a colour chart (supplied by whoever is doing the profile for you) using standard printer and Photoshop settings, and using the paper stock and inks for which you need the profile. Send the print to the profiler, and they’ll send you a profile on CD or via email which you then set as your printer profile. You should also receive instruction on the best Photoshop settings to use to get the most from your printer. It’s relatively cheap to do now, and saves a ton of wasted ink and paper.

By setting your image, monitor and printer profiles properly, you have the basis for working with digital images far more reliably, and can avoid costly problems when it comes to print projects.

As usual, I have skimmed the subject in the briefest fashion, but if you have any questions, I’ll do my best to answer them. Look out for my next blog which will deal with photo captions, and how they can help your google ranking! YAY!

Article and photo © Tim Gander.

Tim (that’s me) is a trained press and commercial photographer, based on the Somerset Wiltshire border, covering also Dorset and taking in Bath, Bristol, Swindon and Salisbury, though his regular clients send him all over the country.