Fan Control

It’s an exercise in stating the bleedin’ obvious to say that a computer is an integral part of most photographers’ equipment, unless perhaps you’re Bill Eggleston, though it’s possible even he uses one now, I don’t know. Bill? Billy? If you happen to be reading this, why not drop me a comment at the end of this article to let me know. That’s if you have a computer with which to read this post of course.

Back to the plot, I certainly do have a computer. In fact I have a relatively prehistoric Apple MacBook Pro which must be getting on for four years old (that’s 50,000 computer years, 1.3 trillion if it’s a PC) and I was starting to worry it wasn’t up to the task any more.

Over the time I’ve had this computer I’ve asked ever more of it. The files from my cameras have doubled in size, I’ve upgraded to Lightroom 4 and PhotoMechanic 5 on top of all the regular software anyone uses when they have a computer and I’d become increasingly aware of the fan noise that would start up whenever I worked on images. Lightroom in particular seemed to get the fans working hard.

Sometimes it was as if there was a DC10 on my desk getting ready for takeoff, and I had been wondering if some harm was coming to the processor, which is what the fans are there to cool. I say fans, there are two in my machine, and a nifty piece of software called Fan Control tells me what the temperature of my processor is in ºC, what speed each fan is doing in RPM and I can adjust various settings to dictate when the fans kick in and what temperature they’re trying to maintain.

Fan Control preference pane for MacBook Pro

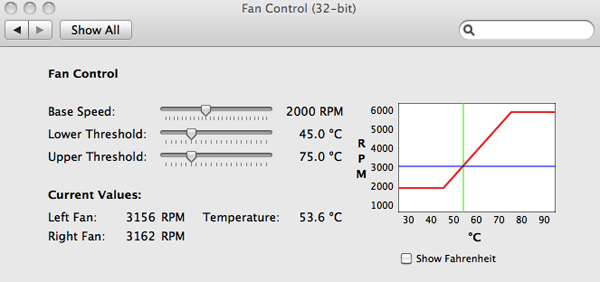
Hours of geeky fun controlling and monitoring processor temperature

I was alarmed to see my processor running at around 80 ºC or more on a regular basis, the fans straining to reach their top speed of 6,000 RPM presumably to stop the laptop catching ACTUAL fire. And then I had a brainwave…

When you open an older MacBook Pro, the hinging movement of the screen reveals a long slot along the back (see photo) and this slot is the air intake which the fans use to draw in cold air and expel the heat. So I got my vacuum cleaner with a brush attachment and gave the slot a good clean out. What a revelation! Where my laptop would routinely be running hot on even basic tasks like writing a blog, it is now silent. Running Lightroom still causes the fans to kick in, but instead of around 85 ºC, the processor runs at anything up to 20 ºC cooler.

Air vent on a MacBook Pro

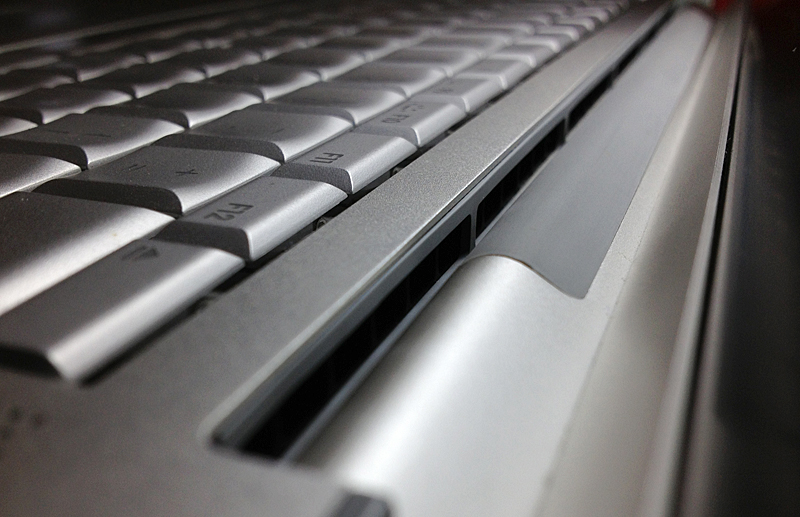
Cleaning out the vents lets the fans work more efficiently

The laptop doesn’t run any faster, but it’s quieter, cooler and will be using less power. Plus the processor and other gubbins are less likely to fry and I’m less likely to be hit in the head with the shrapnel of an exploding fan. That really would be a disappointing way to die.

A Spot of Bother – Beware The Blob!

I’m quite convinced that when I talk to some clients about post production, they think I’m just a con artist trying to make life difficult, complicated and expensive for them. Perhaps they put me in the same category as a car mechanic, who stands there sucking his teeth, telling you all the expensive things he’ll have to do to your car to make it run properly. Like emptying the ashtray, or fitting a new phalange.

Why can’t I just shoot the photos and hand over a CD of everything and let the client go on their merry way? Well I could, but before I let my pictures go, one of the most important tasks I carry out is to ensure the images are clean.

I don’t mean I check them for naughty lady bits. Hopefully on an average corporate shoot there isn’t even the remotest risk of that. What I mean is the fuzzy blobs that show up on a photo when dust attaches to the camera sensor*.

This is a common problem for digital SLR cameras. Every time I change a lens, I’m letting dust into the gaping mouth of the camera, and the next time the shutter is fired the dust gets attracted by static charge onto the sensor which shows up as a grey mark on the image.

Some SLRs have special cleaning settings which shake the sensor down on startup, in the hope that the dust can be vibrated off. But these systems are only effective up to a point. I regularly clean my sensor manually, but I have to change lenses on most shoots, letting more Hoffman – sorry, I mean Dustin.

dust spot on digital photo sensor.

Top and bottom-left, blobs tend to show up more against blue.

So when I get the images onto my computer, in addition to the setting of resolution for print or web use, colour and exposure tweaks, captioning etc ad infinitum, I check each and every frame for those dreaded blobs. If not viewed at the right percentage (size) on screen, they can easily be missed, but they’ll manage to show up nicely on your website, and even more so in print.

To the extent that they’ll look ugly on a photo, they can wreck an expensive print run of brochures, so tell me, do you feel lucky? Do you think you can spot and eliminate The Blob? Apart from anything else, do you really have the time to sit there and take blobs off every photo you use? And what if you miss one?

Next time you think the photographer resembles a shark with the scruples of a politician, just remember the alternative could be worse; a photographer who doesn’t care enough about your project to do proper post-production.

*To be pedantic, it isn’t the imaging sensor which gets the dust on it, but a filter which sits directly in front of the imaging chip. This filter, known as a high-pass filter, is there to reduce the amount of infrared light getting to the sensor, as this gives photos a strange colour cast. Digital camera sensors are very sensitive to infrared light, so the filter is necessary to counteract it.